Friday, August 19, 2011

Bread Log 11: A small post for a large bread

Technical difficulties have delayed the breaducation video post for the time being, but the bread logs shall continue unabated.  My most recent bake was Hamelman's "Miche, Pointe-a-Calliere", and voila:
-

-
There it is in all its glory.  No before you think that I've lost my recently acquired knack for getting decent volume out of a loaf, this bread is actually supposed to have a low profile.  In fact, most of the elements of making this bread lend toward that goal.  First, it is a VERY wet dough, 80% hydration, where a standard dough is in the upper 60's. The second is an extremely high percentage of whole wheat flour.  Up until now the whole wheat loaves you have seen have hovered around equal parts bread flour and whole wheat.  This formula officially asks exclusively for high extraction wheat flour, a flour in which a small percentage of the bran has been removed.  This puts it closer in spectrum to whole wheat (0% bran removal) than bread flour (100% bran removal).  Because I couldn't get my hands on any high extraction flour I followed Hamelman's substitution suggestion using 90% whole wheat, and 10% bread flour.  The higher whole grain content makes mixing to develop gluten a slower process thanks to all those sharp edges puncturing the gluten network.  To counter this I gave the loaf an extra long autolyse, which gave the dough an extra boost of development without having to use the somewhat counterproductive mixer.

The third element contributing to the flatter loaf, and the most definitive is the shaping.  Rather than a tight first shaping followed by a tight second shaping, this loaf only received a rough first shaping followed by a light second shaping, similar to the rustic loaves from early posts. 

The final reason why this loaf is flatter is because:
-

-
It's HUGE.  Miche is a term for a large round loaf, emphasis on large.  For the production version of this formula the suggested scaling weight is 5 pounds, and it's not uncommon for a miche to weigh more than that.  The home formula is just shy of 4 pounds and it still nearly exceeded the width of my pizza stones. Another point of reference shot:
-

-
And here is a shot of the crumb.
-

-
I was curious to try the loaf as Hamelman insisted that the loaf be allowed to rest for 12 hours before eating, and stated that it's flavor would gradually change over the course of a few days.  While I know this is common enough for large naturally leavened loaves with a high percentage of whole grain, I have a hard time waiting an hour to cut into bread so this was arduous.  After letting it cool on a rack, I wrapped it in linen to rest the remainder of it's time.  My initial impression was that it was a dense, highly acidic bread with a strong undercurrent of wheat.  True to his prediction however this balance shifted over the course of the next 3 days, the sourness receding and the wheat flavor coming to dominate the impression.  I went from shrugging over the results to loving them, it makes me more excited than ever to get to the heavy rye breads some of which require a 24 hour rest.  Next week will be a light one again, as Whit and I are going to visit my new nephew, but I am in the process of baking as I type this, and will try to post the results while we are on the move.  Who knows, perhaps I'll even bake out there! 

-Vino

Here are the details from the bake:
Room Temp:  74.5
Water Temp: 51.8
Flour Temp:  75.6
Preferment Temp: 80.1
Final Temp: 75.7 (target 76)
Autolyse: 50 minutes
Mix: Standard incorporation + 2 minutes at speed 2, cut on bench, 2 minutes at speed 3
Bulk Fermentation: 2.5 hours with folds at 30, 1:15, and 2:00
Bench Proof: shape, 10 minute rest, shape, 2:15
Bake: ~45 min @ 460 degrees for 20 min then 420 for the rest
Steam: Spritzed bread, steamed on load and for 30 seconds after.


Saturday, August 13, 2011

Bread Log 10: Vermont Sourdough


Yes my friends, the time has come to embrace the natural . . . to shake off the yoke forced upon us by the tyranical commercial yeast barons. . .

You'll have to forgive me, this is why my wife doesn't allow me sugar after 9:00 pm. 

Bad jokes aside, it is a nice change of pace to be working on sourdough breads again, they are wonderfully flavorful and have a longer shelf-life than their commercially yeasted cousins. This is all thanks to the use of natural yeast in the form of a starter also known as levain.  As I was preparing for this post I realized that while I have explained many aspects of technique and materials I have failed to talk at ALL about one of baking's most important ingredients: yeast. Every formula you have thus far seen on the this blog has used commercial yeast as its only source of leavening, but there are a number of types of yeast available on the market:

Cake Yeast - comes in foil wrapped blocks, and before I got more experience as a baker I thought of this as the real-deal yeast that was probably used at all the professional bakeries.  Turns out not to be the case. Why not? It is highly perishable, and as a result can yield less consistent results.  You still may see older recipes which ask for it, but I'd google some conversions rather than worrying about getting your hands on it.

Active Dry Yeast - This is the only yeast I interacted with growing up, in its iconic little foil packets. It contains little oblong granules of live and dead yeast cells with some growth medium thrown in for good measure.  It is the least perishable form of yeast living for up to a year at room temperature, or over a decade frozen.  It does however need to be rehydrated (or "bloomed") before incorporating it in a recipe, and can suffer thermal shock if this isn't done at the right temperature.

Instant Yeast -  This is what I (and the bakery I worked at) use.  It is very similar to active dry yeast, but has smaller granules and a better percentage of live to dead cells.  It is more temperamental than active dry about storage, but when kept in the freezer like I keep mine . . . well lets just say I bought a pound of it when I left the bakery 2+ years ago, and haven't had to buy more.  It also has the considerable advantage of being able to be added directly to the dry ingredients without having to concern yourself with blooming it.

 Here it is in all its not very impressive glory.  I store the majority of it in a big mason jar in the deepest part of the freezer, and keep a small supply in a small mason jar at the front.  If you can't find instant at your supermarket, you can get it online, a single vacuum packed pound of the stuff will last you for a mighty long time.


So if I'm not using my beloved tyranical instant dry yeast what am I using? This:


If you guessed a blob at the bottom of a piece of tupperware, you get a gold star for the day!  This is my starter, and though it may not look like it, it may older than I am.  I received a bit of starter from one of my colleagues at the bakery which he had been using regularly for many years.

Keeping a starter alive is not a terribly complex process, though it does take consistency.  At the bakery the main levain we used (both white and rye varieties) were fed 3 times a day every day, and over time that yields an amazingly consistent culture.  When I am not using my starter regularly (as has been the case for the past few months of bread blogging) I refresh it a handful of times a week.

A refreshment involves moving a small amount of the developed levain to a new tub, adding fresh flour and water, mixing it together then letting it ripen for 6-8 hours. If you aren't planning on using it for a while it can be placed in the fridge after it has ripened.

In order to get my starter back up to speed for the coming formulae, I have been refreshing it 3 times a day 2 to 4 days a week for the past few weeks.  Most importantly I always refresh it at least 3 times consecutively before the final build for a recipe.

The final build is very similar to the preferments used in the earlier bread logs.  They vary from liquid builds (much akin to the poolish) to stiff builds (like the biga).  Unlike their predecessors however, they comprise the entirety of the yeast used in the formula.


 . . . enough with the back story. The formula for this week is a predominately white flour dough with a bit of whole rye added for flavor and extensibility. By in large, the process of working with a naturally leavened bread is like that of what you've seen in prior posts.  The only really changes are that of degree.  The extra enzymatic activity and acidity of the dough slows down the doughs development which requires extra autolyse and mix times and possibly additional folds during bulk fermentation.  Beyond that, the bulk fermentation and final fermentation tend to be a bit extended.

I chose to make 5 smaller loaves so that Whit could share them with her co-workers.  It also allowed me the opportunity to play with my shaping and slash patterns.
-
-
These are the 3 batards.  The outer two were a longer pointed shape the inner obviously more stubby. I did a single slash on the stubby one, a double slash on one of the tapered:
-
-
Then I decided to try something different with the last tapered batard and tried some cuts with scissors:
-

-
Yeah that didn't pan out so well, but it still tasted delicious! The cuts I made were at too steep an angle and their own weight resealed them before they could spring open in the oven.  This yielded an overly dense loaf.  It is easy to see the difference in volume in this side by side shot.
-

-
Lastly, I made a couple of boules and was sure to give them decently deep slashes:
-
-
My moderate scissor technique aside, the bread turned out quite well.  Baking it also reminded me how much I love the smell of sourdough bread fresh out of the oven.  That tangy acidity courtesy of the cultures lactobacilli is unmistakable even in the aroma.  In the next few days I'll be posting a video breaducation post of the mixing process I taped during this bake, so keep your eyes peeled.  One last thing before I go.  I need a name for my starter, so I'm going to open it up to my 5 or 6 readers out there to propose suggestions.  Just leave your ideas in the comments below!

-Vino

Here are the details from the bake:
Room Temp:  75.7
Water Temp: 65.7
Flour Temp:  78
Preferment Temp: 85.2
Final Temp: 80.5 (target 76)
Autolyse: 30 minutes
Mix: Standard incorporation + 2 minutes at speed 2, cut on bench, 2 minutes at speed 3
Bulk Fermentation: 2 hours with folds at 30, 60, and 90 mintues
Bench Proof: shape, 15 minute rest, shape, 2.5 hours for the batards, and around 3 hours for the boules with  0 minutes in the chiller
Bake: ~25 min @ 460 degrees
Steam: Spritzed bread, steamed on load and for 30 seconds after. and added skirts of tinfoil inside the oven to slow the venting.

Saturday, August 6, 2011

Bread Log 9: Semolina (Durum) Bread


Back in my days at the bakery one of my favorite breads was a semolina bread coated in sesame seeds. The formula I baked from for this entry is fairly different than what we used back then, but the resulting bread still made me nostalgic.

Semolina is a flour milled from Durum wheat.  It is a pale gold color, and is used throughout the Mediteranian and surrounding regions for everything from bread and couscous to pasta.
-
-
I put some semolina flour side by side with an all purpose flour so you can see the difference.  What you can't tell from the picture is that Semolina also has an unusual texture, more coarse but not jagged.  The less milled varieties feel a LOT like ball bearings when you roll it between your fingers.  This is probably why the flour is often used to dust the bottoms of proofed loaves to facilitate sliding them into the oven. The finished dough retains that lovely pale gold color, and has a light almost buttery flavor.  Sesame seeds are often paired with the bread and add a nice nutty flavor as well as a striking visual appeal.

The first Semolina formula in Hamelman's book uses an unusual preferment called a flying sponge.  I will let you conjure your own mental image for that.  It differs from other preferments featured thus far in that it contains the yeast for the entire mix (usually some is added during the mixing stage as well), includes a small measure of sugar, and only gets made an hour and a half before the mix as opposed to 12-16 hours prior.

Because the preferment represented 40% of the doughs flour I chose not to add my customary autolyse.  Despite a final temperature of 4 degrees warmer than I had aimed for, the mix went quite well.  When it came time for the bake I opted to try something new.  Half of the dough was shaped into a standard boule, and the other half I divided into 5 strips.

Here you can see I have already shaped 2 out of the 5 strips into longer baguette-like shapes.  While making the strips into boules before turning them into baguettes wold have yielded a more even mass, it would have also required three shapings to achieve the final shape. I didn't want to over handle the dough.


Here you can see the fist shaping in the middle, with the elongated second shaping below it.  The one at the top has been seeded.


Speaking of seeding, here was my seeding set up.  The shaped loaf is rolled on the wet paper towel in the left pan, then transferred to the sesame seeds on the right.  I did this with 2 out of the 5 strands.


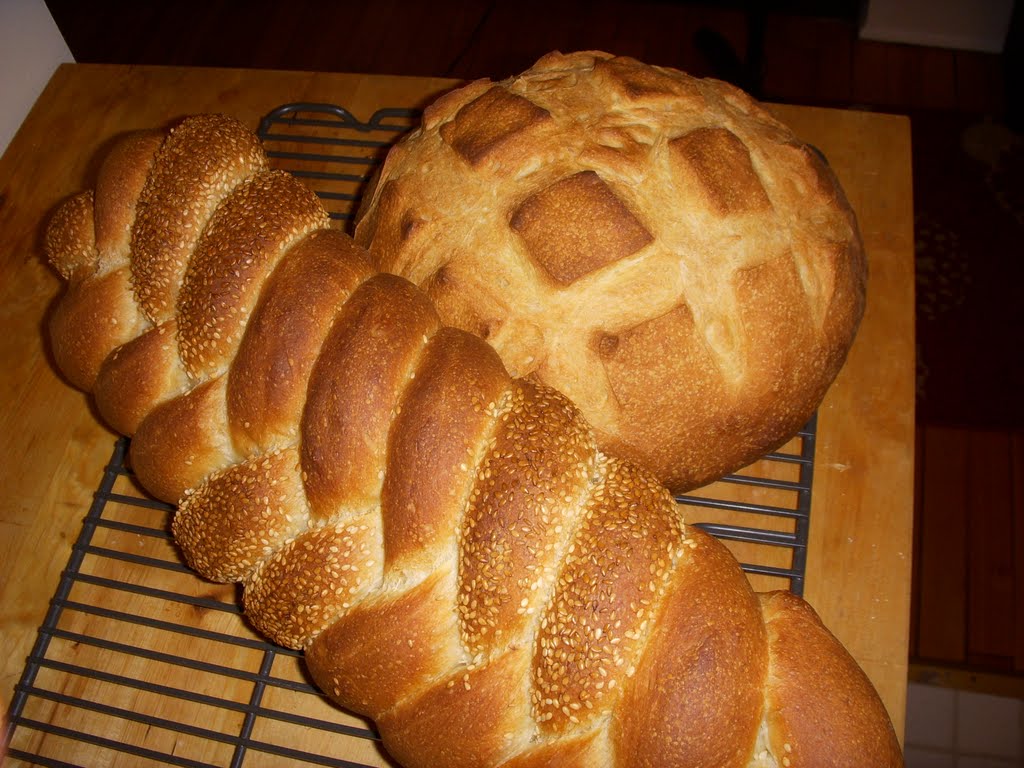
This was the result!  I looked up how to do a 5 strand braid and voila!  Ideally I wanted the two sesame strands to be separated, but in my braiding naivete I alternated them at the onset.  A mistake my wife assures me I would have known not to make if I had gone through grade school as a girl.


Regardless, I was quite happy with the end results.  After the great volume I got in the beer bread, I tried to achieve a similar level of mix this week and I was rewarded for the effort!  Here are some shots of the finished boule slashed with the straight lame:
-
-
The volume is really good, and if you look close you can see a speckling of little bubbles on the side of the loaf.  That is a sign that I was getting good steam!  In addition to my fancy steamer I also chose to mist the bread lightly upon loading to see how that would effect the results.
-

-
Yeah, that's my high-tech misting apparatus.  I used it on the braided loaf as well.  The braided loaf didn't grow tremendously, but it was still nice and light relative to it's size so I was satisfied.
-


-

It was a fun bake and a delicious bread.  The next time I encounter Semolina it will use a sourdough starter, and I look forward to seeing the differences.  I was going to be baking my first sourdough bread on Monday, but it looks like it will have to wait a day, because I have a job interview!! Wish me luck, and thanks as always for reading.

-Vino

Here are the details from the bake:
Room Temp:  77.7
Water Temp: 51.3
Flour Temp:  75.9 (averaged between the two)
Preferment Temp: 81.2
Final Temp: 79.9 (target 76)
Autolyse: None
Mix: Standard incorporation + 3 minutes at speed 2, cut on bench, 3 minutes at speed 3
Bulk Fermentation: 1.5 hours with 1 fold at 30, and 1 at 60
Bench Proof: shape, 15 minute rest, shape, 1.25 hours for the boule, and around 1.75 hours for the braided loaf  no time in the chiller
Bake: 35min for the boule, 28 for the braid @ 460 degrees
Steam: Spritzed bread, steamed on load and for 30 seconds after.

Saturday, July 30, 2011

Bread Log 8: Beer Bread with Roasted Barley . . . and BEER!


I realize that the word is in the title, but it bears emphasis.

I knew going into this recipe that I would have to make one adjustment, substituting plain ol'e hulled barley for the asked for malted barley.  In the context of grains, malting refers to the process of soaking the grain till it germinates, then drying it to arrest the growing process. It develops enzymes which modify the grain's starches into sugars.

While finding malted barley is simple enough (you can get it from most home brew stores) it is hard to find it A) husked, something which doesn't matter for brewing, but definitely does for eating, and B) only lightly roasted.  It was the latter which prevented me from getting my hands on some in this case, as the only husked malted barley I could find was heavily roasted, and would have thus imparted a more bitter flavor.  Here is what I wound up with:
-
-
As you see it here it would have required a process similar to what I did with the rye berries for the Sunflower Seed Bread in order to not chip a tooth.  However in place of that process the recipe asks for the grains to be ground, and lacking a sufficient grinder I used the next best thing:
-

-
This is my mortar and pestle, Enrique the Crusher . . . I'm still working on the name.  By grinding down the grain, it allows it to hydrate more quickly in the context of the bake itself, though in retrospect I might have given it a bit of a soak before hand regardless.

When it came time to bake Whit found me working diligently in the kitchen . . .
-
What, you can't expect the bread to get beer and not share!


 Actually, in this case the beer got 11ounces, so all I got were the dregs.  Still a decent way to start a bake.


-
The mix itself went pretty decently.  Because I recognized the grind on the barley was a bit more coarse than was ideal I added an autolyse to help soften it up before the mix proper.  That is fine in a hypothetical sense, but because the poolish preferment constituted such a high percentage of the water the benefit was negligible.  What's more the relative stiffness of the autolysed dough compared to the poolish slowed down the incorporation step and helped contribute to an overly warm final dough temp.

I corrected as best I could by adjusting the bulk fermentation and bench proof times.  And the final results were pretty impressive!
-
I chose to make 4 small loaves and one large one.  As I have been having problems recently with good volume in my finished loaves I decided to play with the slashes.  They are all within a quarter ounce of one another, and I slashed each one a different number of times at roughly the same depth.  I expected the single slash to be in sufficient, causing an overly dense loaf, and the four slash to be excessive resulting in a flat loaf, with the two in the middle being about right.


Here is what I got:

All four of them expanded so substantially they either ripped the slashes or found their own ways to grow.


 I wasn't incorrect in one sense.  The single slash loaf (on the left in this picture) was the smallest of the lot.  The slash obviously hardened before it had finished expanding and to relieve the internal pressure it expanded from the weakest point, the side closest to another loaf.
However, even the one with four slashes wasn't satisfied.  You can see it ripped the the left most slash all the way down the base.


-
In spite of them not turning out perfectly it was such a nice change of pace from the slightly flatter loaves as of late that I couldn't have been happier.  That is until I took the large loaf, a batard, out of the oven.
-


-
Here it is pre-bake.  I did a single slash along its length with a curved lame.
-
-
Here it is after.  You can really see where the slash expanded, and it made probably the best ear I have ever made on a loaf at home.
-
-
Here is an up close and personal shot of the loaf.
-
-
A shot from the side, to give you a sense for the volume.
-
-
Lastly here is a shot of the crumb.

Here are the details from the bake:
Room Temp:  77
Water Temp: 62.4
Flour Temp:  77.4
Preferment Temp: 78.6
Final Temp: 77.7 (target 76)
Autolyse: 20 min
Mix: long incorporation + 3 minutes at speed 2, cut on bench, 3 minutes at speed 3
Bulk Fermentation: 1.5 hours with 1 fold at 30, and a half fold at 60
Bench Proof: shape, 15 minute rest, shape, 1 hour bench proof for the minis, with the batard spending ~20 minutes in the fridge to retard development
Bake: ~26 for the minis 40 for the batard @ 460 degrees
Steam: Steamer used pre-load and for ~45 seconds post load on first loaf, and 1 minutes for second

I really enjoyed this bread, the color is beautiful, and while the flavor of the crumb is mild, the aroma of beer and barley is phenomenal.  I'm looking forward to trying this one again sometime and tweaking it to my own nefarious designs.  Thanks as always for reading, if you have any comments, critiques, or suggestions for things you'd like covered or what you'd like me to emphasize in my posts leave it in the comments below, and I'll do my best to accommodate.

-Vino

Wednesday, July 27, 2011

Bread Log 7: Corn Bread . . . but not that kind

After a week and a half of getting settled at the new apartment the various ducks were finally in their respective rows, and I was able to get back to baking!  The formula on the docket, Corn Bread, but I would wager this:
-

-
isn't the image that comes to mind when you hear that title.  No 9x9 casserole pan quick bread, nor chili to pair it with.  Though admittedly I am quite fond of the ol'e standby cornbread it's similarities to this recipe are limited to name and the presence of this stuff,
-

-
yellow cornmeal.  As you can see from the picture above I've taken to storing my additions (and small quantity specialty flours) in mason jars.  They are cheap, easy to clean, airtight, and surprisingly pretty when filled and set out on the baker's rack we use as our pantry.
-

-
Though the cornmeal only constitutes 25% of the total flour in this bread, it still has a striking impact on the development of the dough, as well as the texture of the crumb in the final product.  The reason for this is that even a fine grind of cornmeal like what you see above has a jagged texture.  Even after soaking or cooking it maintains that texture to some degree.
The formula asks for 15 minutes of soak time for the cornmeal alone.  As this uses the full water content of the final bread, I used substantially cooler water to account for it warming over time.  I had a bit of a slip up (in retropsect) when I waited to add the olive oil until after the end of the autolyse.  Even though I had the poolish to add at that point, the oil greased down the works and slowed the incorporation to a crawl.  After watching it spin merrily around in the bowl for about 20 seconds I decided it would be faster if I went about it the old fashioned way and finished the incorporation by hand.
My own mistakes aside, the cornmeal really made its presence known during the mix cycle. The sharp edges of the granuals have a tendency to puncture the gluten network and slow it's development.  This can be counteracted by additional mixing time, and by additional folds during the bulk fermentation. I opted for both of these strategies, and still the dough was a bit slack when it came time for shaping.  The end results were pretty solid however.
-

-
To achieve this look I put some flour in a sieve and dusted the top of the loaf at the end of it's bench proofing, just before slashing it with a straight lame. The effect is striking, though admittedly I may have been a bit overzealous on the flouring front :).
-

-
The flour present on this loaf was just the flour used on it before putting it in the proofing basket. The coiled ridges in the basket trap extra flour in them however, which results in the pretty spiral pattern you see on many of my loaves.
-

-
Here, of course, is the crumb.  You can't see it well in this picture, but the yellow of the cornmeal appears sporadically throughout the loaf.

Here are the details from the bake:
Room Temp:  75.9
Water Temp: 61
Flour Temp:  73.8
Preferment Temp: 77.5
Final Temp: 77.7 (target 76)
Autolyse: 10 min cornmeal soaking alone, 10 min with breadflour
Mix: long incorporation + 3 minutes at speeed 2, cut on bench, 3 minutes at speed 2, cut on bench, 4 minutes at speed 3
Bulk Fermentation: 1.5 hours with 3 folds after 20, 40, and 60 minutes
Bench Proof: shape, 15minute rest, shape, 45 minute bench proof with the boule spending ~35 minutes each in the fridge to retard development
Bake: ~35 minutes @ 460 degrees
Steam: Steamer used pre-load and for ~45 seconds post load on first loaf, and 1.5 minutes for second

All in all it was a good bread to start with at my new apartment.  Be on the lookout, I'll be doing one or two more breads with yeasted preferments (which is all I have done so far) before moving on to sourdough breads. Thanks as always for reading!

-Vino

Thursday, July 21, 2011

Breaducation 3: The Process.

With the post-move turmoil it will still be a little while before I have the time to get in the kitchen and bake.  So I thought it would be an excellent time to post a breaducation entry, and I have had one up my sleeve for just such an occasion.  While you may have gleaned the general shape of my baking process from my posts I thought it would be beneficial if I took a post to outline the whole process.

For each step, I will do my best to explain in a general sense the what, how, and why.  Later installments will break down the list into chunks and combine pictures and videos to help illuminate some of the concepts which are better seen than read.

Step .5 - Preferments

Unless you are making a straight dough you'll be using some form of preferment.  You'll see different names for this depending on who wrote the recipe, but whether they refer to it as a sponge, starter, mother, levain, biga, poolish, or pate fermantee, it boils down to the same thing: a prefermented portion of your final dough.  This step usually takes place 14-16 hours before the bake (hence the .5), and serves to create a longer lasting more flavorful bread, by allowing allowing the yeast and enzymes free reign for a while. 

Here is a picture of the ingredients for a pate fermantee scaled into my mix bowl.   The goal with a preferment is NOT to develop the gluten but just to bring the ingredients to full incorporation, i.e.) you don't see anymore flour. You can use a silicone spatula or mixer for this step, which I do for wetter preferements like poolish, but I have found that my hands make shorter work of the process on stiffer preferments such as this one.
 Here is what a pate fermentee looks like fully incorporated.


Step 1 - Scaling

The day of the bake has arrived, and before you can get crackin' its best if you have all of your ingredients measured and ready to go so as not to keep the dough waiting when the time comes.  I think we all have the mental image of the grandmother making dough from a formula that exists only in her head, measuring ingredients, by sight and feel alone.  That tactile sense for the accuracy of a dough is something which requires consistency to learn.  The proverbial grandmother got that consistency by learning from someone more experienced (perhaps the proverbial grandmother's proverbial grandmother) feeling her mistakes and correcting them.  For those of us learning on our own, the consistency required to develop a tactile sense comes from scaling your ingredients.

 If you have watched any cooking shows, you probably know flour compacts and so volumetric measurements such as cups will hinder consistency.  Get a digital scale and weigh all of your ingredients. 
Also along the same lines, it is worth taking the temperature of the primary ingredients, particularly the flour, water, and room.  Recognizing ahead of time that you are baking in an 90 degree oven pretending to be your kitchen, allows you to adjust the water temp to compensate.

Step 2 - Mixing

Once you've got all your ingredients scaled and temped it's time for the real fun to begin.  What you put in the start of the mix will differ depending on what kind of bread you are making, but it will at least be two ingredients: water and flour.  If you are making a dough without additions (such as a soaker of grains and seeds) which requires an autolyse that will be all you add. 

This is a picture of the Roasted Potato Bread autolysing.  Autolyse is a fancy term for letting the dough sit for 20-30 minutes after bringing the flour and water to incorporation, but before the addition of salt and yeast.  It allows the flour to fully hydrate and gives the enzymes some time to work their magic.  Ultimately, this means the dough requires less time actually being mixed lowering the chances of over-oxidizing the dough, thus preserving flavor.


Not all doughs require an autolyse, though in my experience it is almost always beneficial.  It does however add time to the overall process, which is why in a professional setting the step is skipped if it doesn't make a marked contribution to the end product.

Once the autolyse has come to an end you can put the mixer on speed 1 and incorporate the salt and yeast, then add any preferment incrementally.  With the ingredients are fully incorporated the actually mix time begins, and the focus shifts from evenly distributing ingredients and flour hydration to developing gluten.
My mixes break down into multiple sessions in the mixer (which rarely exceed 3 minutes each), interspersed with cutting the dough on the bench. 


Both the kneading action of the hook and cleanly cutting the dough help to further the development of gluten.  However, even when a dough is finished mixing it will not have achieved it's ultimate level of development.

Step 3 - Bulk Fermentation

The baking process I learned allows the dough two primary periods to rise,  bulk fermentation is the first and longest. 

I use lexan tubs which I spray down with cooking spray before adding the dough. I prefer square relatively straight sides, as it allows for easy folding of the dough, and allows you to easily judge the overall volume change during the fermentation.
At intervals of 20 minutes or greater during the bulk fermentation the dough is folded as many times as is necessary to achieve the correct consistency.
Here I am in the act of folding the dough. 
Folding the dough involves stretching out one side and folding it over (roughly 2/3s of way) onto itself.  This is repeated on each side.
This action is one more step along the way in developing the gluten in the dough, and the results can be seen instantly, and even after one fold you'll see the dough increasingly pull away from the sides of the tub as it becomes more cohesive.


Step 5 - Dividing

The effort required to make five loaves of bread is almost identical to the effort required to make one, so you may as well make some to freeze or share.  Up until this point it's been one dough (hence the term bulk in "bulk fermentation"). But with the transformation from amorphous blob to loaves drawing nigh we will need to divide the dough into the number of loaves desired.

The first thing you'll need to do is flour the board where you intend to do your cutting.  The lower the hydration of a dough (and the better it's gluten development) the less flour you'll have to use.
Invert your tub over the floured area, add some extra flour around the perimeter, then scrape that flour under the dough with a bench knife.
Gently spread the dough out just to the point where it's an even thickness.  With home mixes you should be able to eyeball the number of loaves relative to the amount of dough.
Even still, it's beneficial to weigh the dough, as air pockets, and additions can make the volume deceptive.

If you are making ciabatta or another unshaped rustic loaf, be more conscientious when you spread out and divide the dough, as that is all the shaping the dough gets.
Regardless it's not the end of the world if you need to trim from one piece and add to another.  Just be sure to dust excess flour off of any trimming before adding it to the new piece.
Step 6 - Pre-Shaping

We've been talking a lot about gluten development, and the shaping of the loaves represents the final step in that process.  The more rustic the loaf, the less shaping will be required: Ciabatta - no shaping,  Rustic boules - 1 shaping,  Batard - 2 shapings.  Attempting to jump straight to the final shape will present you with one of two end results: 1) the dough becomes too tense during the shaping and tears as you try to elongate it; 2) the dough doesn't get enough tension worked into it and is flat bottomed and uneven along it's length.  Pre-shaping allows you to avoid these pitfalls.

Regardless of the final shape the first shaping is the same, a boule.  If the dough is very active, take a moment to de-gas the dough by slapping it with the flat of your hand.

That's right baking as stress relief.

I'll include a video for the actual shaping in the not too distant future, but suffice to say the de-gassed dough is then rounded into a boule shape.  This process de-gases further and gives you an even shape for the final shaping.


Step 7 - Bench Rest

This is an easy one.  You just put the pre-shaped loaves onto a lightly floured linen then cover with plastic so they don't dry out.

 The purpose of the rest is to prevent the first of the pitfalls listed in the previous step.  Through the shaping the gluten network gets stretched to its capacity.  Allowing the dough to sit for 15-20 minutes gives it time to relax before it is given its ultimate shape.
More of my high-tech baking equipment.  I always keep a few plastic grocery bags on hand for baking.  You'll see them appear again in a couple steps.


Step 8 - Shaping

With the dough consistently shaped and relaxed, it's time for it to take its final shape.

 Even if you are making a boule, it is worth the time to do a second shaping.  Just as before you'll want to de-gas the dough (aka slap it silly) then round the loaf.

It's a bit hard to tell, but if you compare this picture to the earlier ones you can see the increased tension of the dough in the smoothness of the surface. 
Once you have your desired shape you'll place it in floured proofing baskets, or on floured linens as in the previous step.


Step 9 - Final Fermentation aka Bench Proof

Yet another step which basically means wait for a while.  Cover the baskets well so as not to dry out the loaves.  In a well run bakery all of the pauses you've seen  in this process are filled with earlier (or later) steps for  other doughs.  In the time between the dividing/pre-shape of a sourdough mix, you could cut/pre-shape a batch of rye.

THE RETURN OF THE PLASTIC BAGS!
If you've read my trials and tribulations with the roasted potato bread, you know that the duration of the bench proof is a fickle mistress.  It varies due to dough temp, room temp, type of dough, type of yeast . . . etc.  So it is best to not assume what is written in a recipe is set in stone, and use your experience and senses to tell you when a dough is ready for the oven. A proofed dough will be slightly slower to bounce back from your touch and you won't feel a core of denser dough just beneath the surface.

Step 10 - Scoring

Scoring/slashing the dough serves to create a weak point from which the dough can expand in the oven.  Without adequate scoring a dough will be overly dense, or may just find its own structural weakness to exploit.  Unless you are making a Fendu style loaf in which the weakness is the result of shaping, scoring happens just before the dough goes in the oven. Scoring is also aesthetically appealing and in a bakery can serve to differentiate one variety of bread from another, or the work of multiple bakers.  Use of a curved or straight razor blade, known as a lame, is a common method of scoring dough, but it is not the only way.  Here are some pics of various scoring techniques.

 Curved Lame. 3 slashes.
Scissor cut boule.


Fendu loaf.


Step 11 - Baking

It's finally time to turn the dough into bread.  About 30-45 minutes before loading the bread in the oven you'll want to set the oven to pre-heat.  The more mass in your oven the longer you'll want that pre-heat window to be.  The more mass the better, as it helps even out the temperature fluctuations which are part of a home ovens cycling.  Mass in this case comes from things like pizza stones or a cast iron pan for making steam.  I use 3 stones, two on the lower rack and one on the upper rack.

To load the bread into the oven you'll need a peel or flat cookie sheet to slide the bread onto the stone, and something to keep the bread from sticking to said peel.  If you want to give your bread that traditional feel to the bottom crust use a fine ground corn meal or semolina flour.  If you don't like the smell of burning cornmeal and get tired of cleaning off your oven and pizza stones then use parchment paper.  I did the latter for a few years, and if I were in a bakery setting the cost of parchment would be prohibitive, but I'm not and this is one corner I wholly recommend cutting.

The last thing you'll need for a successful bake is steam.  I have mentioned the benefits in several earlier posts, but it bears repeating.  Steam at the onset of a bake gives your loaf better color and volume.  I now use a hand held steamer and some copper tubing to inject my steam, but have tried every method from boiling water into a preheated cast-iron pan to spritzing the loaves directly with water.  All help, though some are more effective than others.

Step 12 - Cooling

Another waiting step, and the hardest one of the lot.  As soon as the loaf leaves the oven all I want to do is stuff it in my face, but your patience will be rewarded if you wait until it is cooled.

 Hot from the oven, is a phrase often used synonymously with fresh good bread.  However a quality bread only reaches its full potential for aroma and flavor after it has cooled completely.  In the case of rye breads with a high percentage of rye flour they don't achieve their potential for a full day or more.
I know it seems counter intuitive, but I have definitely found it to be true.  Try it as an experiment the next time you bake multiple loaves, cut one immediately and let the other rest for a couple of hours. 

==========================================

The only step remaining is to eat the bread, and after the amount of effort you put into making it, it will taste all the better.  Thanks for bearing with a VERY long post!  I hope you found it informative, and that it helps you keep your bearings as you read through the more sparsely explained Bread Log posts.  Baking shall resume soon!

Vino